Your cart is currently empty!
Setting Up Grain Advancements
The Grain Advancement account needs to be set up as an Other Current Liability. If you treat the advancement as income when received, then you should offset the liability to your Grain Sales account. Here are the steps to follow:
- Click on the Accounting Menu, select General Ledger and click onto Chart of Accounts.
- Highlight the folder called Other Current Liabilities. Click onto the Add Account button. Enter a description for the account such as Corn Sale Advancement. If the money received will be treated as income when deposited then select Revenue for the offset and highlight the account called Corn Sales. If you will treat the advancement as a loan then leave the offset to “None”. Click OK.
- Click “Done” to close the Chart of Accounts.
Recording the Grain Advancement Deposit
- Click on the Accounting menu, select Income, Sales and Deposits and click onto Record Income or Sales.
- Select the correct Purchaser, enter a date and brief description of deposit.
- Click on the “Other Sales and Expense Reductions” button. Enter the dollar amount received.
- Change the account to “Other” and highlight the Grain Advancement account created in the previous steps. Click OK.
- Go to the “How you deposited” section. Click on the desired Deposit Method. If you selected Deposit Now, you will have the option to select the correct Checking account and option of a deposit number and click OK. If you select the For Deposit the dollar should already be displayed. Click OK.
- Click Record and Done.
- Repeat this process for each additional advancement check received until the commodity has been physically sold and you are ready to record the final settlement.
Recording the Final Crop Sale and reduce the Grain Advancement account
- Click onto the Record Income or Sales.
- Select the same Purchaser used for the Grain Advancement deposits. Enter a date and description.
- Click on the Harvested Crop Sale button. Select the correct Commodity and location. Enter the Quantity of bushels sold that match with the final Crop Settlement. Enter the Price per bushel or the Total Sale amount including all the previous Grain Advancement amounts added to the final deposit.
- Select the desired crop sale allocation method and click OK.
- Since the Crop Sale will not match what you really deposited, it needs to be reduced by the Grain Advancement received earlier. Click on the “Other Sales and Expense Reductions” button. Enter a NEGATIVE amount for the total dollars that have posted to the Grain Advancement account. To find this correct dollar amount before recording this transaction, click on the Accounting, General Ledger, Accrual Reports and select Trial Balance. When you scroll through to the Liabilities you will see the accumulated dollar amount that has posted to the correct Commodity Advancement account.
- Change the Account to Other and highlight the correct Crop Advancement account name. Click OK.
- This will leave the balance that should match the final settlement check received for deposit. Select the desired Deposit button. Click OK.
- Click Record and Done.
Selling Harvested Crops
When selling harvested crops you will have the option to select whether you want the sale Based on Quantity on Hand or to Specified Fields Only. This will determine how the sale will be allocated to the field enterprises.
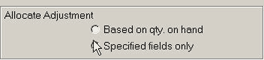 |
If you select Based on Quantity on Hand the amount of the sale will be allocated back to every field that still has quantities of the harvested crop, based proportionately upon their remaining unsold quantity. If all harvested crop sales are recorded using this option, the program will average all of your sales and each field enterprise will get the same average sales price of all sales. For example, if you sell 10,000 bushels of corn at $2.30 and 10,000 bushels at $2.40, the average sales price of $2.35 will show up on each field’s enterprise statement.
If you select Specified fields only and click OK in the Harvested Crop Sale window, the “Allocate Sale of Harvested Crops” screen will appear. The field name drop down arrow will list all fields that currently have an unsold amount of the selected commodity. It will display the remaining quantity on hand for each field. To allocate sales to more than one enterprise, click the ‘Add Row’ button and select the next desired enterprise. You will be able to split the total quantity that you are selling between the field enterprises as you wish. You must allocate the total quantity sold to the fields (the Left to Allocate value must be zero) before continuing.

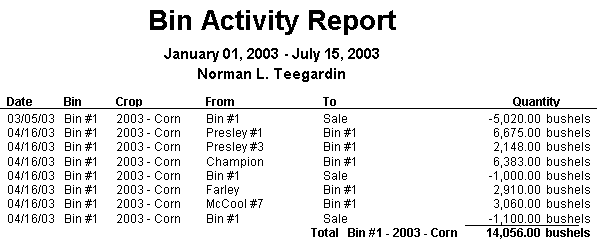
Bin Activity Report
To quickly see the activity of a harvested crop at a storage location, check out the Bin Activity Report that was added in Version 8.5. This report will show harvests going into storage locations as well as adjustments and sales and transfers out of the location.
-
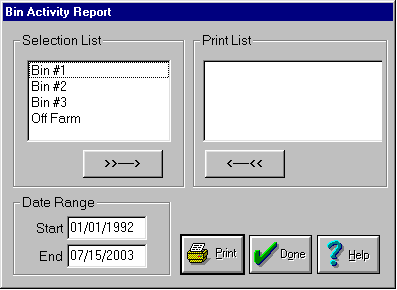 Go to Reports, then Accounting, then Inventory Reports, and finally Bin Activity. The Bin Activity Report window will be displayed.
 -
The Selection List box will list all locations that contain harvested crops. This list may contain structures and/or fields, depending where the crop was stored after harvest operations were recorded.
-
Send the desired location(s) to the Print List side. This can be accomplished by highlighting the location name and left clicking on the arrow below the selection list box or by double left clicking on the location name.
-
Enter the date range for which you would like to print the report.
 Click the Print button. The Bin Activity Report will be displayed on the screen. This report will track any transfers, sales or adjustments related to the selected location.
Left click on the Printer icon to send the report to the printer or select Print from the File menu.
Partially Closing Field Enterprises
The Partial End Enterprise box will appear after clicking on the OK button in the Farming box when you select Partial in the End Enterprise area. This function is used to end a percentage of an enterprise’s inputs, while leaving the remaining percentage in the field.
For example, you might want to divide inputs equally for a hay crop with three cuttings. You would enter a Partial End of the enterprise after each cutting. In the first cutting, 33% of the inputs would be allocated to the ended enterprise. In the second cutting, 50% of the inputs would be allocated to the ended enterprise. Complete a full close for the third cutting, allocating the remaining inputs (33% of the original amount) to the third cutting hay.
Warning: Since the percentage of inputs will include any costs associated with the current action, complete a partial end in a separate farming action after recording the harvest.
To Partially End an enterprise:
- When recording a farming action in the Farming box select Partial from the drop-down listing for End Enterprise.
-
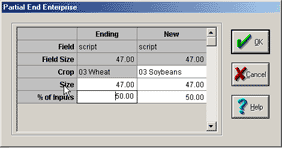 After you select the OK button to record the farming action the Partial End Enterprise box will appear. The box will have two columns representing the part of the enterpriseEnding, (the harvested crop), and the New enterprise that will remain in the field.
 -
The Crop for the Ending enterprise will be the Crop Enterprise that you selected in the Farming box. You will need to select a Crop for theNew enterprise that remains in the field (this crop can be Field Prep.).
Note: When working with a crop with more than one cutting, include a cutting description in the Commodity title. For Hay, you would have crops such as “03 1st cutting Hay”, “03 2nd cutting Hay” and “03 3rd cutting Hay”.
-
Change the Size if desired. The size will default to the acreage of the field farmed for both the Ending and New enterprises.
-
Enter the Percentage of the Inputs that you want to be allocated to each enterprise. Note: The two percentages must add up to 100%.
-
Select the OK button and the inputs will be split between the two enterprises.
Closing Enterprises
In Farm Works, every time that you set up People, Fields, Structures, Equipment Icon, or Livestock Icon, an Enterprise is created for the item. These Enterprises act as completely separate entities that have their own sets of books to keep track of the Income and Expenses for each Person, Field, Structure, Equipment Icon, and Livestock Icon. As such, whenever you record an expense or income item, in addition to having it recorded on your farm books, you can allocate it to your various Enterprises (if desired) and have it recorded on the “Books” of that enterprise. This allows you to see how your business as a whole is doing while at the same time seeing how each one of your enterprises is doing so that you know what enterprises are making money for your farm and what enterprises might be losing money for your farm. This can be extremely helpful when you are trying to decide which fields should be rented or whether you should buy a new implement or rent one or have someone custom farm your fields with their equipment.
As you work in the field, Accounting (Farm Funds) handles the field information differently depending on whether the enterprise is open, closed, or partially closed. Field Enterprises are normally closed at the time the last farming operation for the crop year is recorded, but not necessarily at the end of the year. This is normally the last harvest operation for the field. It is important to make sure enterprises are closed from the prior crop before recording operations for the new crop.
- Record the final farming operation for the crop year (normally the last harvest).
- You will see an End Enterprise option in the Farming box. You will have the option to select Yes, No or Partial. If this is the last farming operation for this crop, select Yes.
Note: Partial closes are used to end a percentage of an enterprise’s inputs, while leaving the remaining percentage in the field.
Note: Fall tillage operations are normally considered as preparation for the next year’s crop. This may vary depending on how you decide to track costs on your farm.
- Selecting Yes closes the enterprise and tells Farm Works that no future farming operations will be added to the enterprise. The next farming action that you perform on the field will go to the next year’s crop.
If all farming operations are already completed but the enterprises have not been closed, use the following steps to close the enterprises.
- Go to Accounting – Enterprises – Enterprise Maintenance. The Enterprise Maintenance window will be displayed.
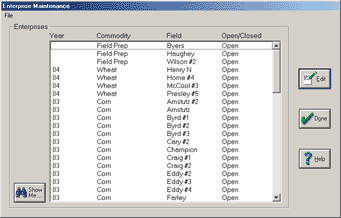
- The Enterprise Maintenance box lists the Year, Commodity, Field and status of the enterprise (opened or closed).
- Highlight the enterprise to be closed by left clicking on the desired enterprise.
- Click on the Edit button.
- The Edit Crop Enterprise box will list all information pertaining to the selected enterprise.
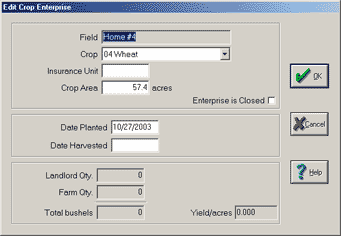
- Check the box next to Enterprise is closed; this will close the enterprise. Click OK.
- Repeat the above steps for each additional enterprise that needs to be closed.
- Click Done when all desired enterprises have been closed.
Fix Mistakes without Voiding Entries
Excerpt from The Complete Guide to Farm Funds
Note: This tip applies to Version 11 and earlier.
A common mistake when entering purchases and sales is to post an entry to an incorrect account (rent instead of repairs, for example) or to enter amounts incorrectly (overpay one account and underpay another). One way to fix a mistake such as this is to void the entry and re-enter it correctly. However, some entries are quite detailed and you may not wish to re-enter them. Instead, the entry can be corrected as follows:
- To correct a payment, select Accounting from the menu bar and choose Payments and Purchases from the drop-down menu. Select Record Payment/Purchase. (Similar entries may be made from Income, Sales and Deposits for corrections that involve sales.) For this example, assume that we mistakenly recorded $50 to Rent Expense that should have been recorded toRepairs Expense.
- To correct this error, choose the same Vendor from the drop-down list in the Payments and Purchases box.
- Enter the Date of the transaction.
- Enter a brief Description explaining the correction being made.
- Select the same button from the Items Purchased area that was used in the original transaction for the wrong account. In this example, the Other Expense and Payment button
 was used to enter Rent Expense.
 - Select the incorrect expense account to which the entry was originally recorded. In this example: Rent Expense.
- Since the amount was previously recorded to the account as a positive number, enter the same number as a negative so that it will be removed. In this example, enter -$50.
- Click OK to continue.
- Select the button that relates to the correct account or item. In this example, the Other Expenses and Payments button should be used to enter Repairs Expense.
- Select the correct account that should have been used. In this example: Repairs Expense.
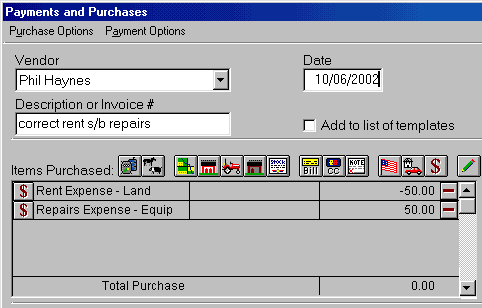
- Enter the amount as a positive number. In this example, enter $50.
- Click OK to continue.
- Both adjustments will now appear in the Items Purchased area. If all information has been entered completely and correctly, your entry should now balance. Make any changes necessary at this time. Click Record to post your entry.
Equipment does not show up in list of Equipment
I allocated an expense back to an asset previously set up but now it doesn’t show in my list of Equipment. Why?
When you set up a piece of Equipment if you check mark: “Item is not used in Farming Jobs” it will not show on your list of equipment to allow you to allocate an expense, but it will show up on your depreciation schedule.
