Installing and Registering Old Versions of Farm Works Software
Are you looking for step-by-step, easy to understand instructions about how to install Farm Works Software on desktop and handheld computers? Follow these instructions!
- The CD will auto-run upon insertion into the CD drive. Installation choices will be:
Install Farm Works Office Programs: includes Farm Trac, Farm Funds, Farm Stock and Farm Site (along with Trac Mate, Greenstar Yield Tools and Calibrate)
Install Site Pro: option installs Site Pro (along with Greenstar Yield Tools, and the Calibrate)
Install Site Mate: installs Site Mate (any module), Guide Mate and Calibrate
Note: To complete Site Mate and Guide Mate installation to a mobile device, make sure that the device is synchronized with your desktop computer (the Active Synch icon in the lower right-hand corner of your screen should be lit up and green)
Install Navman Drivers: installs the required drivers to use a Navman GPS receiver with Site Mate
Demos: program demos
Tutorials: program tutorials
- Select the program(s) to be installed and follow through the installation wizard.
Note: To install more than one of the above options, you will have to repeat the installation process. For example, if you have Farm Trac, Farm Site and Site Mate you will have to install twice. Farm Trac and Farm Site is one installation and Site Mate another.
- The destination directory will default to c:\farmproj (this can be changed by clicking Browse)
- Reinstalling/Updating-make sure install directory is the same as the first installation
- Enter CD key numbers for each program owned (except Greenstar, Calibrate, & Navman Drivers-these do not require CD keys). Note that your will need new CD keys. These keys are provided on a sticker on the back of your new CD case.
- Once installation is completed and the computer restarted, a Farm Works shortcut icon will be created on the desktop. Open the shortcut and enter the licensee name.
- If you are installing the Trac Mate program, the next time your hand held device is synchronized an installation window will appear asking if you would like to install at that time.
Registering Farm Works Software
- New Farm Works users will have 20 unregistered uses available once they install the software.
- The screen asking for registration numbers will appear each time the program is opened until the registration numbers are either entered or all 20 uses are used. Once the initial 20 uses are exhausted registration numbers will have to be entered to continue use of the program. You will not need to re-register your software when installing an update.
- If registration numbers are not initially entered, users will not have full access to all of the software features (i.e. users will not be able to exit Initial Setup until reg. numbers are entered).
- There are three ways to register.
- On-line: there is a direct link to On-line Registration from the Farm Works registration screen or go to www.farmworks.com/register. You will receive the registration numbers via email within 24 hours (usually less than that).
- By phone: call Farm Works to receive registration numbers.
- By fax or mail: Print out a request for registration numbers and fax or mail it to Farm Works (there is a button available for this on the screen that asks for the registration number).
- Before registration numbers can be generated, you must be set up in the Farm Works Software company’s database with the correct programs and CD key numbers assigned to them. Once this is completed, Farm Works Software will need the Installation ID number (for Trac, Funds, Stock, Site, Trac Mate and Site Pro).
- The installation ID # is a 5-digit number found on the screen asking for registration numbers just below the registered name (this number is unique to each computer that the software is installed onto).
 Site Mate has a slightly different registration process
- Registration of version 8.4 and higher requires a 6-digit machine ID number found on the screen asking for the Site Mate registration numbers.
- If you have cancelled out of the registration, the screen can be found by going to File-About Farm Site Mate-Registration Info.
- For versions prior to 8.4, you will also need to know your Customer ID number (no machine ID number required). The Customer ID can be obtained from Farm Works by phone or email.
Once the registration numbers are entered, you will have full access to the purchased program(s).
** If you are installing Farm Works to a new computer, it is only necessary to install the latest version of Farm Works that you have. You do not need to install all previous versions.
Creating a Crop Summary Report (older versions)
The Crop Summary Report allows you to create a custom report for your fields. The crop summary report is useful for making reports for crop insurance, FSA and landlord reporting. You will choose various items such as Field Record information, FSA information, and Legal Description information to print on your report.
To display the Crop Summary Report:
- Select History from the menu bar.
- Select Crops from the drop-down menu.
- Select Summary Report from the drop-down menu. Alternately, from the Keyboard type I, then O then S.
- The Crop Summary Report box will appear.
- The Crop Summary Report Fields Tab allows you to restrict the fields printed on your report. Under Fields to Include select the Year, Commodity,Landlord, and County for which you want to print the report. Note that if you want to print more than one year (or Commodity, etc) you will need to select . Note: click on the All button to select all the displayed fields, click the None button to de-select all the displayed fields.
- On the right side of the window make sure that all the fields you wish to print are highlighted (colored in). If there are highlighted fields that you do not want on your report, click on them to deselect them.
 |
|
|
 |
- In the Report Tab you will see how the report will be printed based on the information entered in the Fields and Records tabs.
- Select the Print
 button to print the report. When you exit the report you will be returned to the Crop Summary Report box where you can create another report to print or select File and then Exit when you are finished printing reports.
- If you want to export the report so it can be loaded
 into another program, click on File and then Export or choose the Export button. Choose a filename and location at the Export Crop Summary Report window and save the file. The report will be saved as a *.csv file which is a comma separated ASCII text file that can be loaded into a spreadsheet or database program.
Using the Planning section of Farm Trac Plus
Farm Trac Plus gives you the ability to enter Planned Jobs for upcoming planting, tillage, spraying, spreading and other farming operations. These Planned Jobs can be used for Planned Summary Reports that include the expected amount of product usage (seed, chemicals, fertilizer, etc) along with planned equipment and personnel usage. These reports are ideal for resource allocation, product ordering, prepaying and budgeting. Additionally you can edit or complete planned jobs so actual farming actions do not have to be re-entered.
Planned operations are very easy to enter as they follow the same user interface that is used when entering actual farming actions. Trac Plus has a Planning menu at the top of the screen that is used for working with planned operations.
Creating Planned Jobs
Planned Jobs will be entered into Trac Plus in the same manner as normal farming actions. This will involve selecting people, equipment and supplies from the tabs on the left and then selecting fields on the map. The following are the steps you will follow:
- Select Create Planned Jobs from the Planning menu to go into Planning Mode.
- Go to the Equipment tab on the left and select the people and
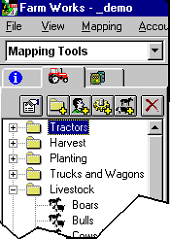 equipment that you wish to use for the planned operation. It is not necessary to use any people and equipment in planned jobs. However, you should select any items that you wish to include in your planning reports. You will select the items that you want and move them to the Working Group below. To select and move an icon to theWorking Group, do one of the following:
 Double click on the equipment or person.
- Right-click on the equipment or person item and select Add to Working Group.
- Click on the item and then click on the
 button in the lower left-hand corner of the screen.
 Go to the Supplies tab on the left and select the chemicals, seed, fertilizer or other supplies that you wish to use for the planned operation. It is not necessary to use any supplies in planned jobs. However, you should select any items that you wish to include in your planning reports. You will select the items that you want and move them to the Working Group below. To select and move a supply to theWorking Group, do one of the following:
- Double click on the supply item.
- Right-click on the supply and select Add to Working Group.
- Click on the supply and then click on the button in the lower left-hand corner of the screen.
- Select the fields that you wish to apply the plan to. This can be done by either:
- Clicking on the
 button. After this button is selected your cursor will change to a Tractor and you can click on the fields that you wish to enter planned jobs for. After you have selected all fields you can click on the Stop Planningbutton.
OR by - Holding down the key on your keyboard and left clicking on each field that you want to enter planned data for. This will select the field and give it a gray cross-hatch pattern. Once all of the desired fields have been selected, right-click and select Apply Working Group.
- Clicking on the
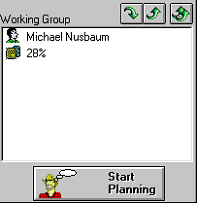
- After the Stop Planning button is selected (or Apply Working Group is selected from the right-click menu), the Planned Farming box will appear. This box will list each of the selected fields in a column along with a Total column. The rows of this box will be the information that you will enter for your plan. Information entered in the Total column will either be split between the fields based on the size of each field (for numeric data such as quantities) or will be copied to each field (for text such as crops). The following is a summary of the data that will be entered:
- Area FarmedEnter the number of acres for the planned job for each field.
- Date & TimeEnter the date and the start and stop time when you plan to perform the job.
- Crop EnterpriseEnter the crop that you plan to have in the field. Trac Plus will default to this crop for future planned operations.
- Note/InstructionEnter any notes that you wish to include with this plan. Notes can include descriptions of where certain supplies should be applied. An example would be Plant P3388 in the west half of the field.
- Charge UnitsEnter the planned number of charge units (hours, tach hours, acres, etc,) for any people and equipment to be used in the planned job.
- SuppliesEnter the planned number of acres and the planned application rate or total quantity to be used for each supply. A cost may also be assigned to each supply. The cost will default to the cost that was assigned to the supply when it was last used (if the supply has never been used it will default to the cost that was entered when it was set up).
- When you are finished with a planned job, items can be removed from the Working group by doing one of the following:
- Double click on the equipment or person in the Working Group.
- Click on the person or equipment in the Working Group then click on the
 button.
 - Click on the
 button and all items will be removed from the Working Group.
- Select Create Planned Jobs from the Planning menu to exit Planning Mode.
Importing Planned Jobs
Trac Plus gives you the ability to import Planned Jobs that are in an FODM format (with an .fsf file extension). These can include plans made by seed reps and crop consultants. Once imported, these plans will give you the same planned reports as would be created if you entered planned data using the above steps. Planned Jobs can be imported by selecting Import Planned Jobs from thePlanning menu.
Editing and Executing Plans
 Once a plan has been completed, you can use Trac Plus to document what actually occurred as a farming action. Farming Actions will be used for creating field histories, notations, chemical reports and more. To complete a planned job:
- Select Editing & Executing Plans from the Planning menu.
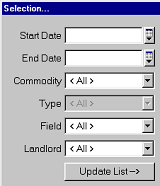
- Use the area to the left to restrict the planned operations to a certain Date Range, Commodity, Field, or Landlord. Once you have made the desired selection, click on the Update List button so only the appropriate plans will be displayed.
- Select the planned operation(s) on the right by clicking on the operations. Alternately the Select All button can be used to select all displayed operations.
- Select the Delete button to remove the selected operations.
- Select the Complete button to complete the selected operations. After this is done the Farming box will come up with the planned information displayed. Make any changes that are needed to reflect what was actually done. Completed Farming Actions will be included in Notations, Chemical, Fertilizer, Seed and other reports.
Printing Planned Summary Reports
Select Summary Reports from the Planning menu to display planned reports. Planned reports can be used for resource allocation, budgeting, planning, product ordering, prepaying and other functions.
Importing Crop Plans (FODM Files) Created by Seed Reps and Crop Consultants into Trac Plus
Trac Plus gives you the ability to import Planned Jobs that are in an FODM format (with an .fsf file extension). These can include plans made by seed reps and crop consultants. Once imported, these plans will give you the same planned reports as would be created if you entered planned data using the above steps.
Creating a Field Report – With Production Costs – in Farm Trac
Did you know that you could create a report that will help you figure out your cost of production without using Farm Funds? With Trac Plus, it’s easy to assign costs to fields and create reports. If you haven’t updated to version 9 or higher yet, here’s a work-around that will relate production costs to fields.
You can create a Field Report directly from an older verions of Farm Trac, then use a Custom Farming Rates book to estimate the rates associated with the items listed on the Field Report.
To create this report:
In Farm Trac,
Click – History
Click – Crops
Click – Field Report
This report will print the crop and field(s) you selected and tell you what your inputs were for the field(s). It will tell you what supplies were used and in what quantity, what equipment was used and how much time or acres each piece of equipment covered, as well as your yields.
Layering Crop Records
To create a new layer of crops the first time:
- With the Main Farming Layer as the Active Layer, select your Pointer Tool.
 Left-click and drag to select all fields. When you release the left mouse button, the fields will be flashing to show they have been selected.
 |
 |
 Right-click and select Copy to Layer.
- In the Copy box, select the Layers button.
- Select the destination layer to which the boundaries are being copied.
Note: You may create a new layer by selecting Layer from the New menu. If setting up a new layer, enter a Name for the layer, 2002 Crops for instance. Select Area Data as the Layer Type. In the area on the right, set up information about each field you wish to record. At minimum, enter Crop as theDescription and select Choice as the Type. Click OK.
 |
 |
 Click OK in the Client Layer box.
- Select OK in the Copy box. The boundaries will now be copied to the new layer.
- With version 8 or higher, displayed layers are listed along the left side of the screen. For earlier version of Farm Site, select Active Layer from the menu bar. AllDisplayed Layers are listed. With the new layer as the Active Layer, (layer on top), remove the Main Farming Layer from the Layers Displayed to view the new boundaries.
- Next, select the Define Area button
 found in the Layer Tools area
  and left-click on each field you wish to define. Add crops, such asCorn, Beans and Cotton, using the drop-down box.
 - Select the appropriate crop for each field. The fields will all appear gray once defined.
 |
 |
 Select the Edit Legend button
  to assign patterns to each crop.
- In the Edit Legend box, select colors and patterns for each crop. You may select colors and patterns used previously that are found on the drop-down list, or select the Color Tab for easy Filloptions
To create additional crop layers:
|
 |
 Right-click on the new layer, Copy of 2002 Crops, and select Properties. Modify the Layer name to an easily identifiable name, 2003 Crops for example. Click OKto accept the new name.
- Click OK to exit the Layer Management box.
- Select the Define Area button and redefine each field with the appropriate year’s crop.
- Choose the crop from the drop-down list, and the field will be colored based on previously defined legends. Continue until each field is redefined.
Importing Site Mate Files into Farm Site or Site Pro
The process of transferring files between Site Mate and Site, or Site Mate and Site Pro can be difficult if users are unfamiliar with Windows Explorer. Follow these steps to move files from Site Mate to Site or Site Pro and to move files from Site or Site Pro back to your Site Mate program. This process will be automated in the future.
To Transfer Files from Site Mate
to your Farm Site or Site Pro:
- Place handheld in Cradle. If the handheld synchronizes with your computer, you will see a green circle
 at the bottom right-hand corner of your computer screen. If the handheld is not synchronized, the circle will appear gray.
- Go to Windows Explorer on your desktop computer. You can
 access this by right clicking on the Start button , and selecting Explore.
 - Click on Mobile Device on the left side of the screen. This will open up all the files found on your handheld. In most cases, the saved files will be located in My Pocket PC, My Documents.
 |
 Note: Each time a file is saved, the location of the saved file will be verified on the screen. If you are unsure where your Site Mate files are, in the Site Mate program go to File, Open Scouting and select Open Log File. The look-in folder will be displayed. Note: Each time a file is saved, the location of the saved file will be verified on the screen. If you are unsure where your Site Mate files are, in the Site Mate program go to File, Open Scouting and select Open Log File. The look-in folder will be displayed. |
- Select the files you wish to transfer to your desktop. If working with Arc View Shape files, each Shape file will have three files associated with it. For example, if you called your file “Field1”, you will find a field1.shp, field1.dbf, and a field1.shx file. Select all three files by holding down the key on the keyboard, and clicking on each file you wish to transfer. Once your files are selected, release the Control key.
 Right click on the files and select Copy.
 |
|
- Select the Farmproj folder.
- At the top of the screen, click File, New, Folder. This will add a folder to your Farmproj directory.
- Select the New Folder. Click on File, Rename. Type a meaningful name for the folder: Site Mate Files, for example.
Note: Organization of these folders and sub-folders is at the user’s discretion. You may find it useful to use a general Site Mate Files folder as above, or geographic-based folders, such as Helgen Farm and Teegardin Farm, or even activity-based folders, such as Planting, Scouting, Variable Rate and Harvest.
 Select the Site Mate Files folder. Right-click, and select Paste. You will see the copied files transfer into the folder Site Mate Files:field1.shp, field1.dbf, and field1.shx .
 In Site or Site Pro on your desktop or laptop, go to File, Import or select the Import
 button found on the Layer Tools toolbar.
- Select Arc View Shape Files as the file type from the drop-down list.
- Click the Input File Browse button. Use the Look In: drop down menu to move to your Hard Drive C. Select Farmproj,Site Mate Files. You will see the field1.shp file transferred earlier. Note that the .dbf and .shx files will not appear. Select the file you wish to import: field1.shp, for example. Click Open.
- Activate Layershould be selected. Click Import.
 Choose the Category under which you would like the layer saved. To add a new folder: Boundaries, for example, in Site Pro select the client to whom the layer will be added. In Site, select the filing cabinet to which the layer will be added.
- Go to New, Category and type in the Category name: Boundaries, for example. Click OK. The Boundaries file should be highlighted. Type in the Layer name: Field 1, for example.
 |
|
To Export Files From Farm Site or Site Pro
to Site Mate on a Handheld:
- Select File, Export or select the Exportbutton found on the Layer Tools toolbar.
- Select the Type of file you will be exporting. In most cases, you will export in an Arc View Shape File format.
- Select the Output File location by clicking Browse. Select Hard Drive C from the drop-down menu, Double-click on Farmproj, Site Mate Files.
- Type in a file name and click Save.
- Select the Layer you wish to export. It will default to the Active Layer. To choose another layer, click the Layers button.
- Select the type of data you wish to export. In most cases, select .

- Click Export. Once completed, the Export screen will be ready for the next export process. To export more layers, repeat steps 2 thru 7. When finished, clickDone.
- Go to Windows Explorer. You can access this by right clicking on the Startbutton. Select Explore.
- Now move to your Hard Drive C, Farmproj directory on the left.
|
|
 Select the Farmproj folder.
- Click on Mobile Device on the left side of the screen. This will open up all the files found on your handheld. Right click on My Pocket PC, My Documents.
Note: Organization of these folders and sub-folders is at the users discretion. You may find it useful to use a generalSite Mate Filesfolder as above, or geographic-based folders, such asHelgen FarmandTeegardin Farm, or even activity-based folders, such asPlanting,Scouting,Variable RateandHarvest.
- Right-click on the folder to which you’d like the files saved, and select Paste. You will see the copied files transfer into the folder Site Mate Files: planting.shp, planting.dbf, and planting.shx.
To Open Files as Background Maps Within Site Mate:
 |
Note: Log files are files to which you will be recording information. Background files are visible background layers to which you will not record information.
|
Default Layers in Site & Site Pro
In Farm Site and Site Pro, you have the ability to set layer defaults, a combination of often-used layers that will be automatically displayed when you enter the program, for your Farm Site project or for each client in Site Pro.
Layer Management Box
 The layer default settings are all controlled through the Layer Management box. The Layer Management box is where you can add new clients and layers, or change or delete existing clients and layers. Additionally, this box is where you can change the layers that are displayed and the order in which they are displayed. There are two ways to access the Layer Management box:
 If you have version 8.0 of Farm Works or higher, select the layer tab on the left hand side of your screen.If you cannot see your layer tab, click on the small right arrow until you see the layer tab. Click on Layer Management.
- Alternately, you may select Active Layer from the menu bar, then More Layers.
Layer Default Combinations in Farm Site
To set up layer default combinations in Farm Site:
- In the Layer Management box, add each of the desired layers to the Displayed Layers area in the order in which you want them displayed.
- Now go to the File menu and select Save As Startup.
The next time that you go into Farm Site, these layers will automatically be displayed for you. This procedure is good for selecting roads, waterways, and other common layers so that they will be displayed automatically.
Layer Default Combinations for Clients in Site Pro
With Site Pro, you can set up default layer combinations for each individual client, similar to Farm Site. This is useful when there are certain layer combinations (such as yield and soil type layers) that you frequently use for each client.
To set up layer default combinations for each client in Site Pro:
 Go to the Layer Management box and add each of the desired layers for the client to the Displayed Layers area.
Note: This can include any common layers (such as roads and waterways and FSA maps) that you may wish to use.
- Next, right click on the client (in the Available Layers area) for whom you want the default combination saved.
- Select Save As Default for Client.
- When you want to load this default combination of layers for a client, right-click on the client name in the Available Layers area and select Use Default for Client. All of the desired layers will be moved to the Displayed Layers area.
Removing Guide Mate
Have you ever installed Guide Mate accidentally and later discovered that you need the correct CD key and registration number for the program? Read on to learn how to remove Guide Mate from your hand held computer.
Uninstalling Guide Mate after an accidental installation:
 Open File Explorer on the hand held. (Start-Programs-File Explorer)
- Select My Device from the menu at the top of the screen.
- Open the Program Files folder.
- Within this folder, open the FarmWork folder. You will now see several individual files.
- Delete the guidemate and gmText files.
- Close out of the File Explorer window.
If you do not have File Explorer on your hand held device, the files will have to be deleted through your desktop computer.
 Connect and synchronize your hand held device with your desktop computer.
- Open Windows Explorer on the desktop (right click on Start and left click on Explore).
- Locate the My Computer directory on the left side of the screen.
 |
|
Using the Tutorial
Using the Farm Works Tutorial
The Farm Works Tutorial is a useful source of help with your programs. The tutorial can be run directly from your CD while you are running your Farm Works programs or accessed via the Internet. Tutorials available on-line from the Farm Works website are updated continuously to reflect new areas of interest, and may be viewed directly from www.farmworks.com.
To use the tutorial located on your Farm Works CD:
- While Farm Works is running, simply insert your Farm Works CD into your CD-Rom drive.
- On the screen that appears, click on the “Tutorials and Demos” button. It’s not necessary to install the tutorial unless you want an icon on your Start menu.
To use the on-line tutorials:
- Go to http://www.farmworks.com/. Click on the Support section along the left side of the screen.
- Click on the Support Page.
- Click on the On-Line Tutorial Link under the Question section, or click on On-Line Tutorial under Support.
To navigate the tutorial:
For versions 8 and higher, once the tutorial is open, navigate using the listing, or tree, on the left side. Click on the topic you wish to view. The tutorials include step-by-step instructions for commonly asked questions, including screen shots of each step. For versions older than 8, select the program, then subject area you wish to view.
Tutorial information is grouped by program, then by categories within each program. The tutorial can be running at the same time as Farm Works. To go back and forth between the programs, simply click on the buttons on the status bar at the bottom of the screen. You may also select the Help Menu and choose tutorial. Make sure your CD is inserted.